


How to tune Windows 10 for laser-focused productivity
Find yourself suddenly needing to be more productive? Good news! Windows 10 comes loaded with all sorts of tools designed to help you Get Things Done, along with deeper tweaks that can optimise the operating system for productivity even more. Now for the bad news: All those excellent productivity-boosting Windows tools and tweaks are not immediately obvious, with many of the most useful settings buried deep inside a maze of options menus.
We can help. Taking five or ten minutes to tinker with Windows 10 can supercharge your setup, regardless of whether you are trying to keep at work while stuck at home or setting up something more permanent.
Get rid of interruptions

If you want to stay focused on a task, reducing your interruptions is key. That can be as simple as checking your email and social media only at designated times, but Windows 10 can still pop up notifications that can kick you out of a productive headspace, be it from apps or the OS itself. Let’s eradicate those first.

Open the Start menu, click the Settings cog icon, and head to System > Notifications and actions. You have a few different options here. To nuke all notifications from orbit, eradicating them completely, move the Get notifications from apps and other senders item to Off.
For a more nuanced approach, you can click the tiny Focus assist settings link underneath that option, which allows you to set up rules for when and how you will receive OS notifications.
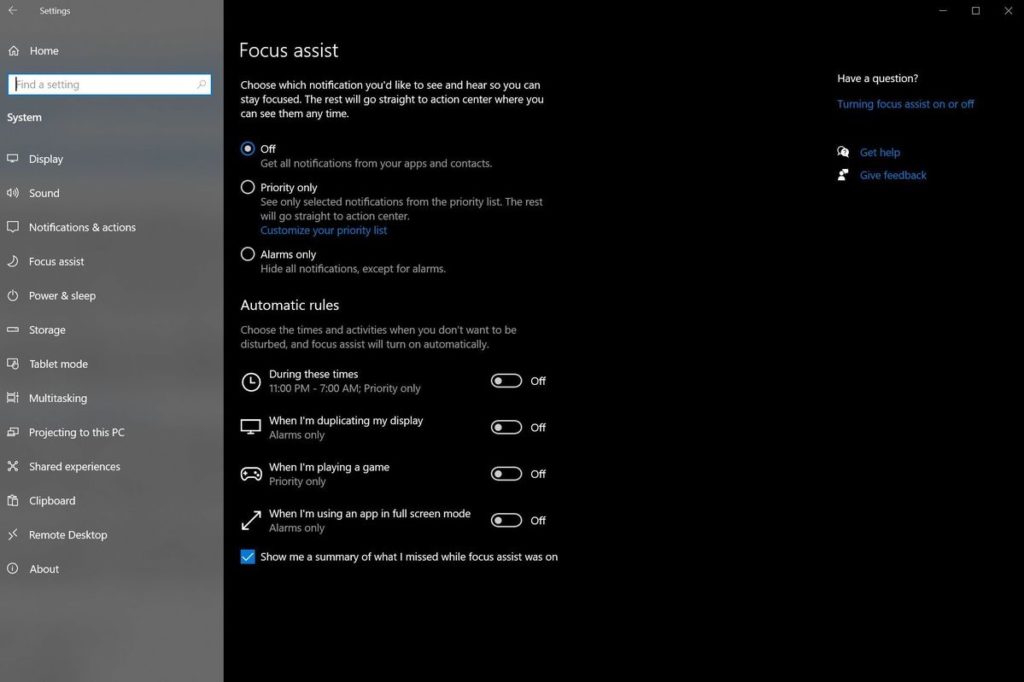
If you want to receive some notifications—say, Mail and Calendar events—but not others, head back to the main Notifications and actions screen. At the bottom, you will see a big list of all the apps that can potentially send you notifications. Slide the ones that are not critical to off.
Notifications are not even the worst offender when it comes to interruptions. Nothing is worse than Windows 10’s forced restarts your PC to install updates. Fortunately, Microsoft’s worked in lots of tools over the years that make that scenario much less likely to occur—if you know they exist, that is.

Head to Start > Settings> Update & Security > Windows Update to tinker with your options. Particularly, check on your Change Active Hours settings. These let you tell Windows when you’re working, and it will not automatically reset your PC during that time. The ability to pause all updates for a week is handy, too; if you dig into the Advanced options menu you can push them out for just over a month.
Organise your workflow
Instilling some order over your workflow can make a big difference. Sure, Alt-Tab-bing through all your open programs can work but taking the time to set up some sort of organisation can help keep things running as smoothly as possible. Windows 10 includes several tools that can make multi-tasking even more productive.
First off: Multi-monitor setups rock for productivity. In a pinch, you can even use a TV as a computer monitor, though they work better as auxiliary displays. That said, not everyone wants (or can afford) more than one display, and the Windows 10 tools below help even if you are stuck on a single screen.

Do not underestimate the power of Windows Snap, a native way to easily divvy up your monitor into multiple segments devoted to separate apps. Grab an open window by its title bar—the horizontal bar at the top that says its name—and drag it all the way to the left or right of the screen, until your mouse cursor touches the edge of the display. You will see a transparent outline flow out from your cursor to fill half the screen. Let go, and the chosen program will expand, taking up that space. Any other programs open on that monitor will appear on the other half of the screen, and if you select one, it will expand to fill that space. Boom! Now you have got two programs on the screen at the same time, split right down the middle.
If you have got a large monitor, or a pixel-dense 1440p or 4K display, you can use Snap to divide your screen even more. Dragging open windows to a corner of your display will Snap them into that quarter of the screen, though using this method will not trigger a prompt asking you what to fill the rest of the screen with. You will need to Snap the windows you want manually to each corner.
It is worth it, though. Having, say, a document, a spreadsheet, your work’s chat software, and Outlook open and visible all at the same time can help you get a lot of stuff done faster, especially if you’re transferring data from one of the apps to another.
Another potent tool for organisation: The criminally underutilised Virtual Desktops feature, which debuted in Windows 10. Virtual desktops let you separate “virtual” versions of your desktop, each running its own instances of software, that you can hop between.
Alternatively, you could set up multiple virtual desktops, each dedicated to its own complicated work task, with all the relevant programs, browser tabs, and documents/spreadsheets open to that project.
To start using virtual desktops, click the Task View icon in Windows 10’s taskbar to summon your Timeline. Select the tiny +New desktop text at the top-left of the screen.
Once you are set up, use the same Task View interface to swap among open virtual desktops in the bar that appears at the top of the screen.
You can also use these keyboard shortcuts to control your virtual desktops:
- Windows+Ctrl+D: Create and open a new virtual desktop
- Windows+Ctrl+F4: Close the current virtual desktop.
- Windows+Ctrl+Left/Right: Switch to the virtual desktop on the left or right.
- Windows+Tab: Open Task View/Virtual desktop interface
Finally, while this guide is dedicated to Windows tips, if you tend to juggle multiple programs simultaneously for complicated tasks, consider paying up for Stardock’s excellent Groupy software. Groupy essentially lets you organise several programs into a single window, letting you hop between each like so many browser tabs. It is great, and only costs $10 direct from Stardock. Microsoft was working on a native tabbed interface for Windows 10, dubbed Sets, but alas, it is dead.
Odds and ends
Getting rid of distractions and organising your workflow will go a long way toward making you more productive, but a handful of other Windows 10 tweaks can make your life easier, too.
Night light restricts blue light emanating from your display by changing its hue, similar to the popular f.lux app. Studies have shown that “blue light at night suppresses melatonin production more than other colours and shifts the body’s circadian timing, thereby disrupting the sleep-wake cycle.”Head to Start > Settings > System > Display and activate the Night Light slider to turn it on, then click the Night light settings link to adjust how it works.
Windows Timeline shows you a history of your recent activity in Microsoft apps, including individual Office files and Edge browser tabs, making it easy to jump back into something you were working on before. If you are a Chrome user, grab the official Web Activities browser extension by Microsoft to enable the same functionality.
You summon Timeline by opening the Task View icon on the Windows 10 toolbar, or pressing Windows+Tab. Your recent activity appears underneath the virtual desktop view. Better yet, Timeline’s tied to your Microsoft Account, so it can travel with you from PC to PC. You can disable Microsoft’s synchronisation options by heading to Start > Settings > Privacy > Activity History and disabling everything.
Cloud clipboard further leverages the connectivity of your Microsoft Account by letting you copy text on one PC, then paste it on another. Head to Settings > System > Clipboard to turn it on and configure its behaviour.
If you have external storage connected to your PC, File History is a godsend, taking snapshots of your files as you go and storing the different versions, so you can recover older saves if need be.
That about does it. If you want to finish your day sooner, be sure to check out 10 time-saving Windows tricks that help you get stuff done faster. Those simple tips are not glamorous, and most are not even new to be honest, but when you use them together, they can seriously streamline your workflow.
IDG News Service

Subscribers 0
Fans 0
Followers 0
Followers